Saturday 26 August 2023

portalampada - lightbulbholder - tail light

In the parts bag I also found the rear light lampholders. And these were really a surprise to me. They were fitted on a rubber strip with ground wires connected to it. How cool is that. Unfortunately the rubber material had become fragile and brittle. In fact, one piece had both ends broken off already and the other one was slight teared:


And they are fitted on the rear panel. Who has designed this?


For photo purposes I had one attached. 


I searched hard to find NOS replacements but these are simply not available anywhere. Not even used photo examples I was able to find.

The closest useable new example would be this item:


It would mean I simply would have to drill one hole and attach it. I saw other similar light solutions whereby the same lightbulb holders were directly attached to the lightplate (model: Catalux Aprilia BS 2515/6 G2):


The following lightholder is a very good example as well. Again these are mounted directly on the frame and are using also unshielded ground wires


As I'm a sucker for originality I simply had to make an attempt to repair the broken rubber. So I came up with this solution. I cut off a small stroke of this rubber scraper 


And made two pieces to be fitted by simply glueing them together. Cutted using a stanley knive and sanding by using a file.


It was more easy as anticipated. Costs made for the scraper and glue was about € 5,-


I now need to source a very small round clamp so the wire can be fitted correctly to the plate (ground). But also I need to find a correct copper screw. One of them was forced by a slightly larger screw (sigh!). 

Also I found out one lightbulb was indeed to large (42 mm) - wasn't aware there were different length sizes for these. Correct size would be about 38 mm. According to the manual it should be a 6V 5W (this one was 15W). And the other one should be 6V 3W.

By now I also found out - with help of the manual, the battery is only there to provide parking light. The normal lighting and claxon electricity is provided directly by the dynamo when the engine runs.

The anti climax is when I tried to fit the fixed solution. Even though the glued rubber was flexible it was still to strong, meaning not able to stretch, so the glued parts simply teared off when I tried to slide it over the iron tips :-(

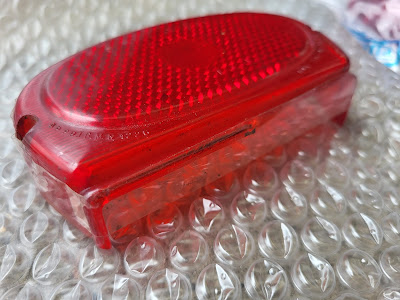
Meanwhile I had bought this other tail light solution. It appears this light was used on a MV Augusta. And as can be seen there has been an original gaskets made for this model. I'm happy to use that. Althought the lense was fairly broken and glued I also could reuse the white lens as that was missing on mine. I also had to glue one part that was broken. But I rather put this together as it's a fragile item that easily can be damaged due to no protection. And by now I do have a new one on stock in any case.

Another good thing is that I can reuse the lampholders on the used spare item if I want to recreate a complete new set using a new stretchable rubber. 


And here is how it looks now:

Friday 25 August 2023

Iso Books

I had ordered this book last month but it only arrived today since they closed the shop due to holiday leave. It was already longer on my list but since I now have the Iso scooter it was a good opportunity to buy it. 


Another book I have about Iso is this one. One of the best books in my car collection. And of course it does contain a little snippet about the Iso Scooters.


Saturday 19 August 2023

Speedometer cable

Today I worked on a small job which turned into a small nightmare. I also forgot my mobile phone today so no photo's on the activities. Well, it's not exactly rocket science either but I always like some photo's for historical and reference reasons. 

In any case, today I made an attempt to connect the new speedometer cable. The previous owner did not install it when he had rebuild the scooter. The cable was also severely damaged. But it would have been a minor job to get a replacement


The cable is about 1 meter in length. So I had ordered one online but it appears the inner cable comes in different sizes as I learned, sigh!  The new cable had 2,5 mm while the original was 2 mm:

So I went to a vintage Vespa scooter shop nearby. I knew about that shop for a long while but never visited them. A very nice owner completely into Italian stuff, just like me. He had on cable on stock left that I needed.  

I had already figured out one riddle using this online photo. The previous owner had put the brake cable into the hole of the speedometer cable. And there was no spare room for another cable. But by seeing this photo I now know how it was suppose to be fitted. Typical the supporting photo is also showing a similar damaged speedometer cable.


So putting the brake cable in the bottom hole and adding the speedometer cable into the other upper hole. But then, horror, the top connector screw dropped into the tube all the way down to the bottom. And there was no way to get it out. I suspect I might not have been the first person running into this issue. The simple trick is of course to use some scotch tape to stick it to the cable.

The only option I  could come up with is to completely removing the front steering rod and then turn it upside down. Then I figured I could use a thin iron wire and push it all the way up and create a small hook at the end. This worked partially but the thin wire didn't reach the top, it got stuck and wasn't firm enough as it bend when pushing firmly.  Then I had this genious idea to use the brake cable. The innercable was thin enough to slide it through the connector screw and by having a bit scotch tape put around the cable it didn't glide over it. Yes, it was fidly job but it worked :-) 

So everything got connected up in the end. I did not use a clamp to secure the bottom-end screw as at some point I need to dismantle the whole scooter to get it repainted. As said earlier, I first would like to have everything complete and working. So this is one item completed.

Wednesday 16 August 2023

Iso Milano / Diva decal / sticker

I found these on Subito and ordered them. Though I ordered one of each I got each decal twice, nice. 


Saturday 12 August 2023

Friday 11 August 2023

Iso Rivolta website + Iso Diva restoration

 A website about Iso Rivolta including a nice page about a ISO Diva series 2 restoration:

http://www.iso-rivolta.info/diva_bilder.html

I always find this very useful to see for reference material (despite this is a series 2):

Thursday 10 August 2023

Instagram - restauracionesextremas - Iso Milano 150

 Wow, look at this:

Esto no paraaaaaa ISO Milano 150cc🙌🙌🙌🙌 falta poco 💪💪💪#isomilano #motos #motonetas

https://www.instagram.com/p/BtXKG7HApSp

They don't have a website but these are there contact details:

MURATURE 4839, Villa Lynch, Argentina, 1672
Adres
  • elsiambrettero@gmail.com
    E-mailadres

Wednesday 9 August 2023

1959 Iso commercial movie : "Il progresso in moto"

Wow! I stumbled upon this unique commercial movie material, offered for sale on Ebay Italy:

https://www.ebay.it/itm/223482879889

I have translated the Italian description below in English:

ISO : FILMATO INEDITO UNICO E INTROVABILE ..." IL PROGRESSO IN MOTO".

DATATO ANNO 1959(VEDI DOCUMENTI) SU PELLICOLA 35 mm DIGITALIZZATO A TREVISO DA TELECINEMA. 

CONSEGNATO A MANO A MIO PADRE DURANTE UNA VISITA ALLA FABBRICA NEL 1959, ESSENDO LUI E I SUOI FRATELLI AI TEMPI AGENZIA ISO (e successivamente officina autorizzata VW  dagli anni 60 a fine anni 90)

STUPENDO!

DURATA 1 MINUTO E 45 SECONDI CIRCA, CON SONORO E SPEAKER.

RIPRESE AEREE SULLA FABBRICA E SULL'ANELLO DI PROVA.

DISPONIBILE A FARLO VISIONARE IN MIA PRESENZA SU SMARTPHONE.

IL FILMATO PARTE CON UN CARTONE ANIMATO PER ARRIVARE ALLE RIPRESE DELLA FABBRICA... MOTO...MOTOCARRI...FURGONI E ALTRO.

PEZZO UNICO!!!


ISO : UNEDITED FILM UNIQUE AND UNAVAILABLE ..." PROGRESS IN MOTORCYCLE".

DATED IN 1959 (SEE DOCUMENTS) ON 35 mm FILM DIGITIZED IN TREVISO BY TELECINEMA. 

HAND DELIVERED TO MY FATHER DURING A FACTORY VISIT IN 1959, HIM AND HIS BROTHERS AT THE TIME WERE AN ISO AGENCY (and later VW Authorized Workshop from 60s to late 90s)

STUPENDOUS!

DURATION ABOUT 1 MINUTE AND 45 SECONDS, WITH SOUND AND SPEAKER.

AERIAL SHOOTING ON THE FACTORY AND TEST RING.

AVAILABLE TO SHOW IT IN MY PRESENCE ON SMARTPHONE.

THE FILM STARTS WITH A CARTOON TO GET TO THE FILMING OF THE FACTORY... MOTORCYCLES... MOTOR TRUCKS... VANS AND MORE.

SINGLE PIECE!!!


Tuesday 8 August 2023

Iso Rubber / Gummi reproductions - footpegs - handel grips - air hose - pedal

 When doing a little advanced browsing on the internet I hit this photo and it was linked to this website:

https://www.pistonshop.it/ricambi-moto-epoca/marca/iso/#cc-m-product-10947106774

They also offer an engine gasket set. More below the first photo.


And I also found this one:

https://www.startgomma.com/en/iso-diva-footpegs-p383


Always useful these items are available when doing a restoration.

Monday 7 August 2023

Tail light - Vetro fanalino posteriore Lambretta LD 1957 - Catalux Aprilia - Ducati - MV Augusta - Iso Feretto

Another item that arrived together with the battery was the rear light

The old one was not damaged but was missing the lower transparant case housing/strip. I think it got lost somehow. And it was "fixed" with cellotape:

Luckily this item is still available as it's another item as used on the Lambretta D150

https://www.riminilambrettacentre.com/it/vetro-fanalino-posteriore-lambretta-ld-1957.html

Price € 15,-


for photo purposes I mounted it but afterwards I put the old one back on again as I fear it might get damaged, it's very fragile. I'm surprised there is not even a gasket for it. Also the lampholder underneath is very particular. More on that in a different blogpost.


I did perform some more checking on the rear light and by surprise I found this photo. It's an item that was for sale. And as you can see it has a gasket. Also you can see the nice lightbulb-holder setup, which is slightly different as done on the Iso. I'm now curious to know on which vehicle this has been used. Althouh it looks similar I suspect it's slightly larger thus different.


It might have been used on the Iso Furetto? I'm awaiting a response from the reseller.


Or on a MV Augusta (this one has the white gasket):


Next I found this light with a metal case housing unit:


After a bit more digging it looks like this might have been used on a Ducati 100cc sport from 1957. Or at least on some Ducati's from that era. After further checking I noticed the rear lights on the Ducati's are however slightly different but close though.


And one more I found, with a metal background plate. I wonder how the bulblight holder looks on the inside. Unfortunately no photo's of that available. Slightly to expensive as well to purchase:


And today I received the photo of the inside, a completely different lampholder solution


Dutch Iso brochure 1961

 Yesterday on the Dutch Marketplace someone offered a Dutch Iso brochure for sale. I got outbid and it was sold for € 15,- It's a brochu...